Solving Complex Mazes In Python Using the BFS Algorithm
Nov 25, 2021
#coding-challenge #scripting #python #algorithmsThe Minefield
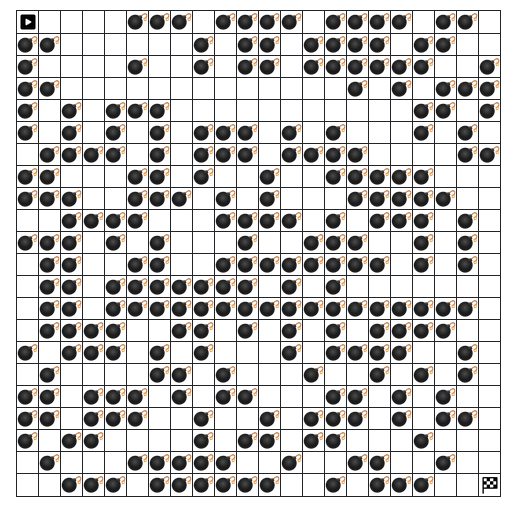
The Mine Field was a challenge meant to assess a penetration tester’s scripting skills by presenting a 22x22 minefield and asking the tester to rapidly find the path from the starting point to the finishing point without hitting the bombs. Furthermore, in addition to the minefield expiring every seven seconds, the answer needed to be formatted as a sequence of directions such as D for down and L for left etc… while also being less than 500 characters.
As a quick summary, the way I solved this was by first scraping the webpage using Python. Then splitting the source code and formatting the minefield (which was inside an HTML table) as a two-dimensional array. After I had a navigable 2D array, I used the Breadth-First-Search (BFS) algorithm to find the path from the starting point to the finishing point and print what steps it took to get there. A more technical and in-depth writeup will follow below.
Step 1 – Transform the Minefield into a Python-Readable Format
The first part of this challenge was understanding how to get the minefield from the webpage into Python and making sure that at any point in time, the minefield displayed on the webpage and the minefield that Python was working to parse and solve were identical. Thankfully, the lab creators gave us a heads up about the minefield being connected to the session cookie of the browser.
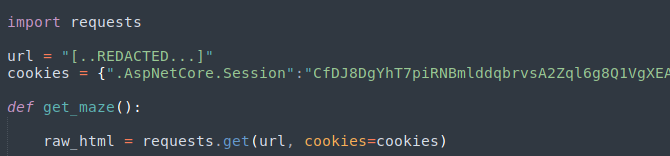
I began by scraping the entire web page in its raw HTML form by importing the requests library and calling the get function to grab the web page’s source. I also passed my session cookies along with the URL so that I could retrieve the same minefield being shown in the browser. The code I used to scrape the web page is shown below.
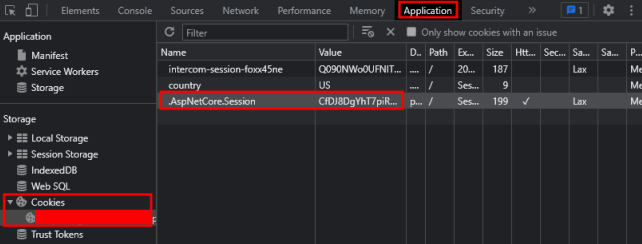
It’s also important to note that the way I retrieved my session cookie was by opening my browser, right clicking, selecting the “Inspect” button, clicking on the “Application” tab, navigating to the “Cookies” section, and retrieving the .AspNetCore.Session cookie value.
Once I had a raw web request stored inside the raw_html variable, I wanted to parse the page’s source code into a sortable and searchable format while throwing out parts of the request I wouldn’t need (like the headers). I performed this by passing the web page’s text into a library called BeautifulSoup which parses HTML code and makes it easier to work with. This was done by importing the bs4 package and passing the raw_html variable to BeautifulSoup as shown and storing the output in the soup variable.

The next step was to figure out exactly which part of the web page contained the minefield I wanted to bring in. This involved viewing the web site’s source code and learning that the minefield was stored inside an HTML table. Each row of the minefield was enclosed in <tr> tags and each cell’s status (clear or rigged) was listed as an attribute of the further nested <td> tags.

To filter out all the extra code of the website, I used the find function of the soup object created in the last code snippet to extract only the HTML that was within the <table> tags. This was done as shown.

To refine this even further I wanted to divide this table into separate rows so that I could iterate over them and construct my two-dimensional array. I did this using some string manipulation with the split function which is available to every string object. I wrote the split function so that every time it comes across the </tr> tag (which signifies the end of the row), it creates a divider.

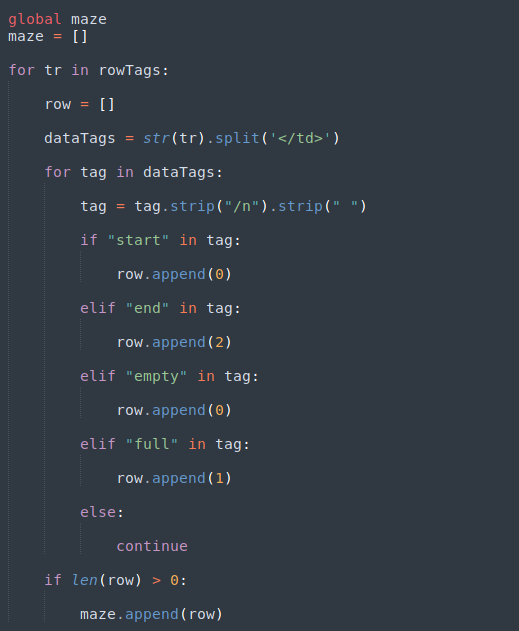
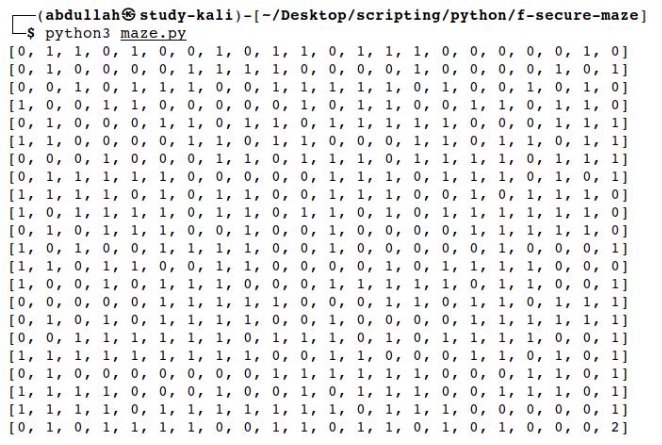
Now that I had everything in a digestible and clean format, it was time to build my 2D array. I initialized the maze variable as a global array and began the construction of a nested for-loop. The logic would be as follows. For every row in the minefield table, create an additional temporary array, split the row into individual cells (at the end of every <td> tag), then for every cell, check whether it had the keyword full, empty, start, or end. Based on the keyword, append to our temporary row, either 0, 1, or 2. Once iteration through every cell in a row is complete, and the length of our temporary array is greater than one, append the temporary array to our main maze array (making it an array of arrays or 2D). The code is shown here.
After coming this far, our output was looking pretty good. Execution of all the code discussed so far yielded the following results. When compared with the minefield displayed on the web page, everything was perfectly identical. Empty spaces were zeros, bombs were ones, and our goal was the number two.
Step 2 – Solve the Minefield
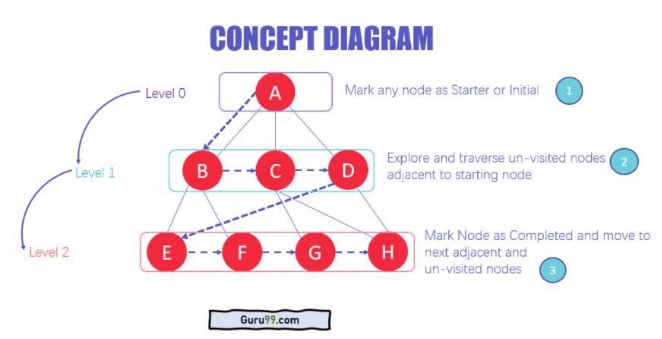
Now that we had our minefield in a 2D array, it came time to pick a pathfinding algorithm which would be used to search for the goal given a starting point and print the path taken to get there while avoiding the bombs. The algorithm I selected is the Breadth-First-Search (BFS) algorithm. It is explained well by Simplilearn. They say, “BFS is used to search a tree or graph data structure for a node that meets a set of criteria. It begins at the root of the tree or graph and investigates all nodes at the current depth level before moving on to nodes at the next depth level.”
Breadth-First-Search uses a queue data structure to store the node and mark it as “visited” until it marks all the neighboring vertices directly related to it. The queue operates on the First-In-First-Out (FIFO) principle, so the node’s neighbors will be viewed in the order in which it inserts them in the queue, starting with the node that was inserted first. Below is a diagram for some additional clarity.
Implementing this in Python to work with our minefield was quite a challenge, nevertheless, existing research was quite helpful in guiding the exercise. The first part of implementing BFS was to establish the key variables it would use. This includes the following:
- Creating a new maze and setting it to the one we retrieved from the website
- Establishing the minefield’s dimensions (rows x columns)
- Creating a double-ended queue (to hold the nodes we want to visit next)
- Adding our starting point to the queue (which will always be (0, 0))
- Defining possible directions that the algorithm could move in
- Assigning letters (L, R, U, D) to those directions by using a hash map
- Creating a blank Boolean array identical to the minefield to track visited locations
- Setting our starting point as visited (since we are already there)
The code to declare and set these variables is shown below.

Now that we have our variables ready, we can begin the processing of the minefield. This is done with a while-loop which will continue as long as there is something in our queue signifying that there are still coordinates left to explore. Each time the loop runs, we will pop out the next value from the front of the queue and look at all the moves we can make from that coordinate (up, down, left, right). We will send said move through a series of validity checks to determine if it’s out of bounds, if there is a bomb there, if we’ve already visited it, or if we’ve reached the goal. The logic can be understood better by reading the algorithm below.
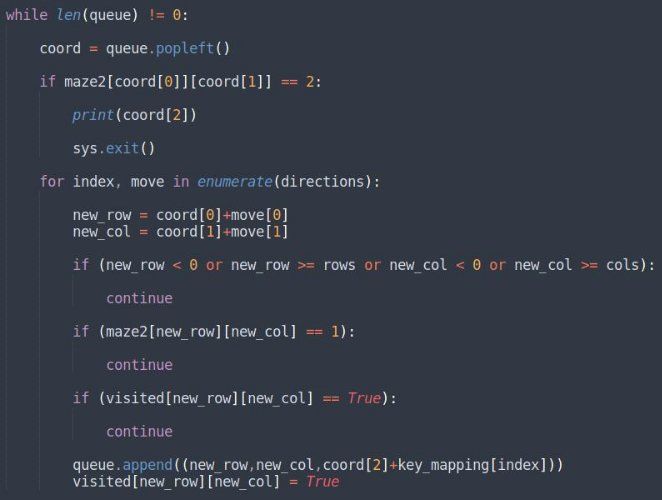
Since there is a lot going on here, lets walk through it step by step. We start off with a while-loop which will continue to run as long as there are coordinates in the queue. Once the loop has determined that there is a coordinate in the queue, we will retrieve it, and check to make sure it is not the goal (which would make continuing the loop unnecessary). Once we know it’s not the coordinate we are looking for, we will send it to our for-loop. Our for-loop will try every move defined in our directions array which was declared earlier.
You might notice that the for-loop looks a bit odd. That is because we are not only looping through the moves in our directions array, but we are simultaneously keeping track of the index numbers of the moves we are trying so that we can look them up in our hash map and connect a given move to a letter (which we need for the answer format). We are using Python’s enumerate function to achieve this.
For every move the for-loop iterates through, it creates a new set of coordinates by adding the current coordinate to the coordinates of the relevant move declared in the directions array. This is performed in the new_row and new_col variables. Once a new coordinate is created, it is checked to determine whether it is out of bounds, if there is a bomb there, or if it has already been visited. If it gets caught in any of those checks, the move is abandoned and the next move is brought into the for-loop.
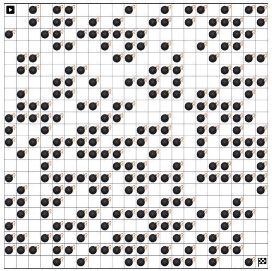
If the move manages to pass all the validity checks, the move along with its corresponding letter, is appended to the queue. The move’s coordinates are also marked as visited to prevent the loop from visiting places it has already explored or determined are dead ends. Once this runs for every single coordinate in the minefield, it will find the target and print all the directions and moves that were taken to reach it, giving a sequence of moves which we can submit as our answer. A demonstration is shown below.


The full script can be found at my GitHub.